Most of us already know that as our printers age, their print quality tends to drift. In addition to the printer’s age, and for lack of a better term, mileage, there are other factors that affect print quality.
Changes like new printheads, different lots of ink and media, and even environmental factors like temperature and humidity can have an impact on quality and consistency, especially over time. In order to keep the quality of your output optimal, there are certain fundamentals that you must adhere to.
Routine Checks: While all printers are different, there are three basic steps that you can follow to maximize the quality and consistency of your output. These steps are nozzle check/cleaning, bidirectional alignment, and media feed adjustment.
Nozzle Check/Cleaning: This step seems like a no-brainer. However, many people only print nozzle checks when they see horizontal banding. It is possible to have several nozzles missing for a single color and not notice any horizontal banding, especially when printing in a high quality or high-pass print mode.
Keeping that in mind, if multiple nozzles are missing for a single color, your color may still shift. For example, if you are printing a shade of blue and you have some cyan nozzles missing, your blue may take on a purple hue. Nozzle checks should be done on a daily basis to ensure you are getting optimal print quality. If any nozzles are clogged, you should run cleaning cycles until the clogs have been rectified.
Bidirectional Alignment: In order to optimize print speeds, most shops print in a bidirectional print mode, which means that the printer lays down ink as the carriage moves in both directions. While this mode significantly increases print speeds, it also introduces the possibility of less accurate dot placement which will result in a “fuzzy” image.

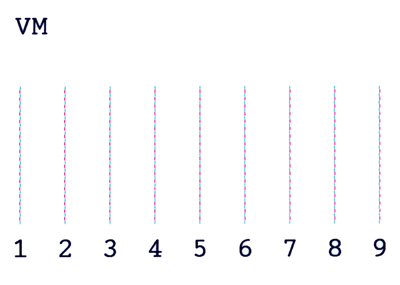
To ensure the highest print quality, you will want to run a bidirectional alignment calibration. This involves printing a target that typically consists of a pattern (usually a series of vertical lines) printed while the head is moving in one direction, then another corresponding pattern (series of lines) is printed above or below the first series of lines while the carriage is moving in the other direction.
Once the target is printed, the operator must choose the value where the lines printed in both directions line up perfectly.
This should be re-checked once every few months, after a major head crash, or after transporting the printer. Some of the newer model printers have optical sensors located on the bottom of the printhead carriage which are capable of reading the alignment pattern and calibrating themselves.
Media Feed Adjustment: Media Feed Adjustment is a calibration that adjusts the overall accuracy of the print length. In addition to getting the wrong print length, inaccurate media feed may also result in horizontal banding.
Banding caused by inaccurate media feed will result in either dark bands or light bands. The dark bands come from the printer not feeding the media far enough between each pass, thus ink from different passes overlaps and is laid down on top of itself. The light bands result when the printer feeds the media too far between each pass.
The media feed adjustment is done by printing a line or pattern that the printer believes to be a specific length. After the print is complete, you then accurately measure the length of the printed pattern/line and enter the value on the printer. The printer then takes the expected value, compares it to the measured value that was entered, and adjusts by compensating the differences.
Environmental Factors
In addition to all of the routine checks, there are environmental factors that may also play a role in the quality of your printing. Some of these factors include temperature and humidity, static, and dust.
Temperature/Humidity: Of all of the environmental factors listed, temperature and humidity are the most important. There are a number of printer-related issues that can arise from printing in a non-optimal environment including, but not limited to static, increased nozzle clogs and color shift.
Another reason to operate in an optimal and consistent environment relates to media. For example, an environment with high humidity causes paper to swell and low humidity causes paper to contract. If the environment is not consistent, the constant swelling and contraction of the media can increase the amount of curl as well as cause a color shift.
If you want to stabilize your environment, and you have multiple printers, take all variables into account. Below are a few of the printers in my print environment, along with their manufacturer’s environmental recommendations:
- Epson Stylus Pro 11880: 50-95 degrees F, 40-50%-Humidity
- Canon imagePROGRAF iPF8000S: 59-86 degrees F, 10-80% Humidity – no condensing
- HP Designjet Z6100ps: 59-95 degrees F, 20-80% Humidity
Taking all three printers into account, the temperature should between 59 -86 degrees Fahrenheit and the relative humidity between 40-50 percent. It is strongly recommended that you look at the printer manufacturer’s recommended operating conditions, and then optimizing your print environment to those specs. It’s also beneficial if both the temperature and humidity stay relatively constant.

Media Storage: It is important to store media in the same environment you are printing in. Here are a few tips for media storage:
The print media should be given 24 hours to acclimate to the environment before printing. Printing to cold media that just made it to Florida from Wisconsin (in December) in 12 hours is not going to print as consistently as a roll already adjusted to the current temp and humidity in the printing environment.
As mentioned above, keep the printing environment’s temperature and humidity as consistent as possible. If you plan to turn off the climate control for the day, you may want to leave it on in the printing area. This will ensure consistent printing from sunrise to sunset and day to day.
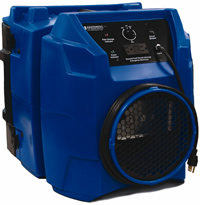
If you’re using forced heat to regulate the printing temperature, you should invest in a humidifier to increase the relative humidity in the print area. This is especially important with piezoelectric printheads to help reduce the printhead from drying out while it’s idle.
Static: Static can come from both the printer and your print media. Either way, if static is present when printing, the quality of your graphics will be reduced dramatically. Static tends to repel the ink from its target, which causes it to land in a random location. The end result is very blurry image quality, with the deflected ink creating a “fuzzy” look around the non-printed areas of the print. I like to describe it as if the print was handled by somebody with dirt or Cheetos on their fingers.

There are a number of different products designed to help mitigate static such as anti-static sprays, tinsel, nylon ropes and numerous others. Some of these products help more than others, but I have yet to find one that truly works all the time. Ultimately, the best way to reduce or eliminate static build-up is to follow your printer manufacturer’s recommended environmental operating specs, which typically yield a medium to high humidity level and a relatively warm ambient temperature.
Dust: Dust is harmful for both your prints as well as your printheads. If your printer and/or media reside in a dusty environment, you are running the risk of dust clogging the nozzles on your printhead as well as impeding image quality.
If dust settles on the inkjet coating of the media you are printing to, it creates a barrier between the printhead jetting the ink and the inkjet coating which is designed to receive and control the ink. Any ink that lands on the dust particles will not get absorbed into the inkjet coating of the media. Instead, it will sit on top of the dust. Since there is no bond between the dust and the inkjet coating, the dust will eventually fall off of the print, revealing small white (non-printed) splotches. The best way to mitigate dust altogether is to print and store your media in a clean environment.
Piezoelectric vs. Thermal Printheads
In aqueous inkjet printing, there are two different types of printheads: thermal and piezoelectric. Solvent and UV-curable printers use Piezoelectric heads. Thermal printers use heat to help jet the ink while piezoelectric printheads use electricity for jetting.
Thermal printheads, found in printers such as HP, Canon, and Encad, are considered consumables, and are designed to be replaced on a regular basis. While every brand and model of printer differs, the average lifespan for a thermal printhead tends to be around 1000mL of ink.
If your printhead has multiple nozzles out, and printhead cleanings do not recover the missing nozzles, it may be time to replace your printhead. I have found that thermal printers seem to be less susceptible to nozzle clogs, and since the heads are consumables, losing a head is not that big of a deal. This also relates to the recommended humidity for Canon and HP, which is between 20-80 % humidity, while the Epson using the piezoelectric heads had an optimal range of 40-50% humidity.
Piezoelectric printheads, found in printers such as Epson, Mutoh, Mimaki, and Roland, use electricity instead of heat to jet the ink from the head. Piezoelectric printheads are designed to last the life of the printer, and are not considered consumables.
Because piezoelectric printheads must last the life of the printer, it is especially important to make sure the printheads are well taken care of. For example, never touch the nozzle plate of the printhead, unless using a cleaning aid approved by the printer manufacturer.
Printheads are incredibly easy to damage and equally hard to get replaced under warranty. Because piezoelectric printheads work better in an environment with a fair amount of humidity, you should ask Santa for a humidifier.
Since cold air holds less moisture than warm air, and forced heat further reduces ambient moisture, a humidifier in the winter months would definitely help reduce nozzle clogs and improve consistency in print quality.
As always, if you have any questions about maintenance, or need help finding an answer to a vexing print problem, contact a LexJet account specialist at 800-453-9538. They have been specially trained to help you troubleshoot just about any situation that might arise. And, if they don’t know the answer, they’ll probably ask me or any of the other technical support experts at LexJet.
