3 Ways to Create Statement Art with Your Images

Looking for new ways to add creativity to your printed images? You can create one-of-a-kind pieces of art with a few creative choices. If you are using an aqueous printer, here are three tips to delight your clients and finish your photos with flare:

GIVE THEM AN EDGE. Three-time Sunset Print Award winner Kimberly Smith loves the Sunset Bright Velvet Rag, which she uses to distress the edges of some of her fine art prints. “The thickness [of the paper] means the tears on the edges are perfect for a soft, multi-layered look,” she says.

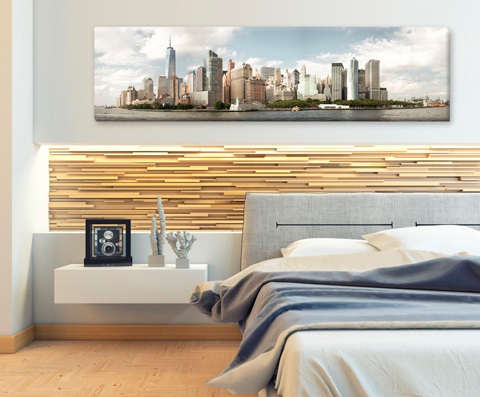
WRAP IT UP. Another way to impress clients is to turn their photos into wall art. Printing on Sunset Select Matte Canvas and wrapping it with the easy-to-use GOframe system creates a final image that is worthy of hanging in any museum.

ADD SOME SHINE. To bring a little extra shine to your images, try printing on Sunset Photo Metallic Paper. Aluminum prints are increasing in popularity, but if you don’t have access to dye-sub equipment, you can get a similar effect with the metallic photo paper. It’s a cost-effect alternative solution that is compatible with aqueous printers. The metallic paper can also be printed and face-mounted to acrylic, using a clear permanent adhesive, to create a unique piece of statement art.

If you are looking for new opportunities with your clients, contact a LexJet sales specialist at 800-453-9538.

Best Practices for Printing an Overlaminate with Timothy Mitchell

HP Latex application specialist Timothy Mitchell explores uses and best practices for the versatile HP Gloss Polymeric Overlaminate. This product not only works as a typical overlaminate used to protect prints, it can also be printed and used as a clear media that works with the HP Latex Print & Cut Solution.

Mitchell suggests using the product for a project like a decorative border around the edges of a window. The clear media works well on windows and can be custom cut using the Print & Cut system.

For optimal results, Mitchell suggests raising the ink load to 200%. “If you were to build this at 110%, and you were to put it in a store window with strong lighting coming through it, it’s going to look washed out … because you have what is a translucent material in a window, and that light cuts the color back,” he says. “If you were to switch that same print to 200% and you put it in there, the colors are going to pop.”

He suggests building the ink signature the same way as a backlit. In the video above, he walks through the steps to do that, and shows how the printer color calibrates and then can create a customized or standard ICC profile, based on the type of Latex machine.

Mitchell also discusses other advantages of the product and how to get the best results. Watch the video above for all of his insider tips and tricks.

Make 2020 the Year You Reach Your Profit Goals

As the last decade was wrapping up, we began looking at 2020 as being full of possibility. But we’re not too naive. We know today’s print service providers are faced with lots of challenges, such as rising wages and benefits costs, pressure to enter new markets, a thin workforce of available, skilled workers and more. So we decided to take a look at two areas where LexJet can help, not just as a materials provider, but a business partner as well.

At the SGIA/Napco Research Key Industry Trends & Insights Research presentation during Printing United, we learned a lot about these challenges. While nearly every sector in the print industry saw growth in sales (yay!), the increase in profits didn’t match up. How could that be? Perhaps investment in equipment, wage increases (and more to come), lost productivity, training up staff in new market segments, or maybe you were paying too much for the wrong products.

One of the startling revelations was PSPs who stated they were “so busy, we don’t have time to figure out what would be profitable.” Yikes! So let’s look into two current, major pain points and see how we can help.

Adding a New Product Line or Entering a New Market

You can diversify the products and services you’re offering your customers, but let’s look at some smart strategies. While it may seem like everyone is jumping into vehicle wraps, ask yourself if you’ve got the proper print technology, installers with experience and product lines you trust. If not, that’s a steep climb before you get out of the red. If you are set up to tackle vehicle wraps, consider starting with simpler applications, such as box trucks, before you get into intricate designs like sports cars.

Inkjet Canvas Decor by MyPix2

Another supplemental market that may have a quicker ramp-up, in terms of production, is décor. This segment covers a pretty wide gamut of applications, from canvas prints to wallcoverings to windows treatments. If you’re in the wide-format space now, you likely have equipment that you can use to expand into décor printing. For instance, if you have an aqueous printer, many materials exist for you to print wall art, such as canvas wraps, fine art reproductions or portraits. Wallcoverings and window graphic materials (like Squid) are decor focused, and can be printed on solvent or latex print technology. Dye-sub printers used for fabric open a new door for upholstery, drapery and more. Your capital expenditure may include finishing tools or machinery, so scope those out and plan accordingly.

Some growing interest in customized décor printing include hotels, restaurants, healthcare facilities and corporate offices, so consider customers you already have in these spaces and market your new capabilities to them!

Combating Material Costs

Another ongoing pain point is material costs. This is always top-of-mind for all of us here at LexJet, as we launch new or next-generation products. We are constantly looking for ways to pass on savings to our customers.

One strategy is to opt for multi-purpose, quality products. When you opt for a “Swiss Army Knife” product, you save on inventory space and production set up time as well as costs savings, much of the time. One such material is FlexTek 170g, also available as FlexTek SUV 200g. FlexTek is a budget-beating, non-woven technical fabric that works in a variety of applications, including wall art, banners and canvas wraps. It can be finished with grommets or it can be sewn or wrapped or folded. It’s recyclable and has a long shelf life — talk about an inventory win-win!

Our print specialists at LexJet can also help you fine-tune your materials and supplemental products that fit into your budget and help your profits soar! Call us today at 800-453-9538.

Four-Part Series: HP Latex Printer Accessories

Part Four – Caring for Your Latex Spindles

In the final edition of our latex tips and tricks series, HP Latex Specialist Timothy Mitchell offers some suggestions for spindle care as well as helpful hints for endcap placement that can resolve some common problems like paper recognition or “roll walking.”

Whether you have the 3-inch aluminum spindle for the Latex 365 or the smaller, adjustable core spindle for the Latex 115/315/335 family, Mitchell doesn’t recommend leaning the spindles against the printer when they are not in use. “It’s easy for the bottom to slip and it hits the ground and gets damaged,” he says. “Take care of them, I use beanbags on top of the printer to rest the spindles.”

Taking care of the endcaps and core adapters is also essential. There are locking mechanisms in place to keep the roll steady during printing that can loosen over time due to improper use. The tension is lost, rolls can slip or “walk.” If you have ever received a notification that the media was rejected or not recognized by the printer, it could be that the endcap is loose and the paper is not properly aligned in the printer.

“If you are doing long runs, using the take-up roll, the endcap needs to be secure and flush against the core,” Mitchell says. “If it gets loose, the media could slide with it. Making sure it’s stable is key.”

Mitchell also has some suggestions for the spindle with the adjustable core. “If you are completely committed to printing on 3-inch core product, you can permanently attach the core adapter with heavy-duty glue,” he says. You will want to ensure the glue doesn’t affect the latch if you choose to create a permanent 3-inch core.

Watch the video above to see Mitchell explain the best ways to keep your spindle and endcaps in working order, leading to a smooth latex workflow.

YOU MAY ALSO BE INTERESTED IN:

Four-Part Series: HP Latex Printer Accessories

Part Three – Custom Butterfly Edge Guards for HP Latex Printers

HP Latex Specialist Timothy Mitchell works with many different brands and types of media, providing him the unique opportunity to help printer operators find answers to some recurring issues – head strike or media curling, to name a few – that may occur.

Mitchell noticed that when he printed on high-intensity prismatic or reflective media and other heavy-duty products that retain curl, the edge guards weren’t properly holding the print in place as it was feeding through, causing it to raise up and contact with the carriage. When that happens, the image can be damaged, which means the graphic must be reprinted.

Reprints are a waste of media, ink and time. Mitchell found that creating a double – or butterfly – edge guard means the media stays closer to the platen, reducing the chance that the print will come in contact with the carriage.

“The reflective films tend to be expensive and when they go through the printer, I don’t want to waste anything,” he says. “They tend to curl a little. I need a little more strength to hold them down after they go through the original edge guards.”

In the video above, Mitchell explains how easy it is to make these guards: “You need to order an additional set, take them apart and put them back together.”

If you have any questions or would like to order an additional set of edge guards, please contact your LexJet printer specialist at 800-453-9538.

Four-Part Series: HP Latex Printer Accessories

Part Two – Using the Counterweights and Take-up Reel on Your HP Latex Printer

Printing panels for trade shows can keep a latex printer and a production manager busy, but there is one tip from HP Latex Specialist Timothy Mitchell that can help lighten the load a little: use the counterweights.

“There are a couple of key pieces to successfully panel printing with the 300 series latex printer,” Mitchell says of the counterweights. If you’ve never used them, they could still be on the dancer bar for the newer 300 series printers. For the older models (310, 330, 360), you may need to contact HP Support to order a set.

When panel printing, it is more efficient and accurate to reduce the tension on the media. The dancer bar adds tension and adjusting the counterweights on either end of the bar allows you to increase or decrease the tension, depending on the media thickness and material.

Another important tool to use properly is the take-up reel. Many people may not know that there is an option to wind the graphics inside or outside.

“If you go inside, there is a little less tension than if you go outside. I usually judge it by the media,” Mitchell says.

Much like adjusting the counterweights, winding media inside or outside depends on the media.

Watch the video above to see Mitchell discuss his tips and tricks for the counterweights and take-up reel. If you have an older 300 series printer, you can contact HP Latex Support.

If you have questions or are interested in learning more about printing with latex, contact a LexJet printer specialist at 800-453-9538 or visit LexJet.com.