Many people who print see the Rendering Intent option and are not exactly sure what it is and how it works. They usually select a Rendering Intent option a friend or colleague tells them to use and then think nothing more of it. It turns out that this selection can have a huge effect on how your image appears, and should therefore be understood fully.
Rendering Intents are mathematical rules on how to deal with out-of-gamut colors when moving from one color space to another. In other words, chances are that when you print an image there will be colors that your camera captured that are impossible for your printer to reproduce.
The printer driver can’t just delete the sections of the images it can’t reproduce or you would get images with large sections of nothing. Therefore, the driver changes those out-of-gamut colors to colors it can actually hit. The method it uses to do this is a Rendering Intent.

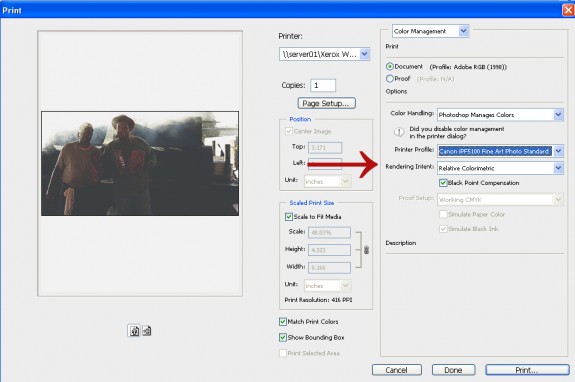
You may or may not have noticed that every time you hit print, there’s a Rendering Intent option. You can see it in the Photoshop CS3 print window (see the accompanying image sample). If you open up that drop-down menu you will see there are four options…
Perceptual: The Perceptual Rendering Intent is a good option for photographers. When using this option, the driver will take the out-of-gamut colors and move them to the closest in-gamut colors, which is a good thing. It will then shift the in-gamut colors so the relationship between all the colors remains the same.
For example, let’s say you have a dark blue next to a red in a picture and that dark blue is out of gamut but the red is in gamut. The Perceptual Rendering Intent will change that blue to a blue that it can hit. However, it will also change the red (even though it could reproduce it because it is in gamut) so that the relationship between the red and blue is maintained.
Most color gamuts get larger when you go to lighter colors. A printer can’t hit that many dark rich colors, but it can hit a large number of pastels. Therefore, in order to bring colors in gamut and maintain relationships the Perceptual Rendering Intent will often lighten or de-saturate the image. It is the best rendering intent for printing transitions and gradients because its main goal is to preserve the color relationships. Therefore, a gradient moving from dark blue to light blue will appear smooth with this rendering intent.
Relative Colorimetric: The Relative Colorimetric Rendering Intent is also a good option for photographers, but it comes with certain risks. Relative Colorimetric will also move the out-of-gamut colors to the closest in-gamut color. However, it will not change any of the in-gamut colors.
As in the example above, let’s say you have a dark blue that is out of gamut next to a red that is in gamut. The Relative Colorimetric Rendering Intent will also change that blue to the closest blue it can hit, but it will not change the red that is in gamut. Therefore, the red is closer to the red you originally shot, but the relationship between that red and blue has been visually compromised.
The goal of Relative Colorimetric Rendering Intent is to alter the colors in the image as little as possible. Therefore it will be less likely to de-saturate an image to bring it into gamut. It is not a good option for printing gradients, however, because the gradient will appear rather choppy.
Picture a front-lit head shot… As the light fades away toward the side of the head, the flesh shifts from highlights to midtones to shadows. Perceptual will handle this shift smoothly. With Relative Colorimetric you might get weird lines where it makes sudden jumps in the dark areas.
However, it’s nice if you’re printing on matte papers since matte images naturally look less saturated. If you print with the Perceptual Rendering Intent it may de-saturate that image even further, leaving the print looking washed out.
Saturation: The Saturation Rendering Intent’s main goal is to preserve saturation over color. So if there’s a dark blue that is out of gamut, then the driver may switch it to a dark green because it has a closer saturation. This option is to be used only for charts and graphs, like pie charts. I can’t imagine a situation where a photographer or other graphics professional would see a blue sky shift to a green sky in certain areas and be happy with that result.
Absolute: This is used for proofing. Let’s say you want to proof a newspaper print that is done on a yellowish or warm stock by an offset press. You are printing the proof on your inkjet printer onto a bright white stock. You can set the white point of an ICC profile so that it replicates that warm or yellow white point of that newspaper stock. In order to use that custom white point you would select Absolute Colorimetric. This is also not useful for photographic output.
Special thanks to Tom Hauenstein for the expertise contained in this article.

Regan, thank you SO much for this article! I’m in a video production class, and all of the other articles trying to explain this topic were too complicated. Yours was very easy to understand for a complete novice like me.
Thanks again,
Nathan.