Step 3 in Color Management: Understanding ICC Profiles and Settings

In Step 1 of the color management to-do list we discussed how the quality of your monitor impacts the precision of your output. In Step 2 of 3 we focused on understanding how printer and media choices affect color. The final step includes learning about ICC profiles and settings as well as some tips and tricks for viewing the print.

How do we get our monitor, which uses RGB values to project your image, to translate to our printer, which uses CMYK values? How do profiles work? And why is following the settings LexJet provides with the profiles so crucial to the accuracy of your results?

Custom Color Profiling
Figure 1 shows the 1,728 patch printout used to make a custom profile.

When LexJet creates a profile, we cover a wide range of specific printer models and LexJet media choices so our customers do not have to go through the time-consuming process of making their own profiles for each product/printer combination.

A Profile is Born
We first start by choosing a media type in the driver or plug-in, depending on which printer the profile is for. This lays down a platform for the rest of the profile to be built upon. If you get this wrong when using the profile your results will show a big discrepancy from the monitor to your print.

We give you this media type and settings to use with every profile we make and each will vary by printer and material type.

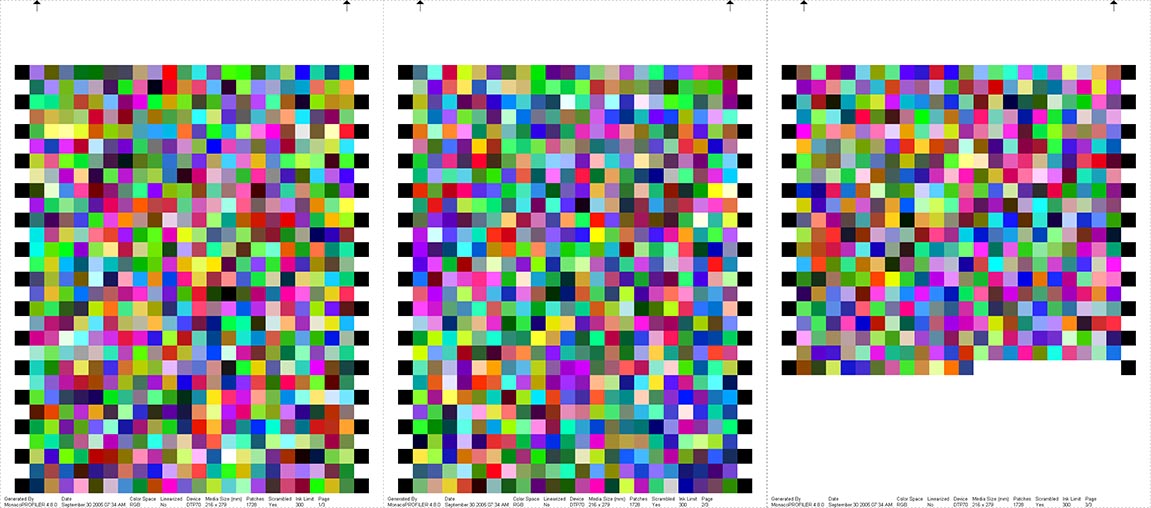
The process uses a chart of 1,728 patches, which are printed to that specific media choice with those specific settings. Each color patch has a mathematical color value set by the International Color Consortium (see Figure 1).

The patches are then run through a spectrophotometer, which then measures the actual values of those colors with that ink and media combination. The software creates a correction curve for that media to reach the closest color in CMYK language that the printer can produce. A profile is born!

To find out how to download and install ICC Profiles, check out the following videos:

Download and Install ICC Profiles – PC

Download and Install ICC Profiles – Mac

Rendering Intent and Lighting
In the process of making profiles there are colors that are out of gamut since you are converting projected light values (RGB) to reflected light values (CMYK). The way the printer determines how to handle those colors is called a Rendering Intent. To read about the different rendering options and what they mean, visit our prior post: How to find the right rendering intent.

For the purposes of this article we’ll generalize by advising you to stick to just Perceptual or Relative Colorimetric. There is an overall theory that Perceptual is usually best for semi-matte, satin or glossy surfaces and Relative Colorimetric is best for matte surfaces. If you want to be specific to each image, use the soft proofing technique to see which looks best on that specific image.

Another point to be made here is that Perceptual tends to produce smoother gradations in color while Relative Colorimetric stays truer to the original color when rendering.

Now that you have your monitor correctly calibrated, you have an understanding of your printer and media you are using and you can comfortably say you are using the right profile, rendering intent and settings. We’re now ready to click print! So here are a few valuable pointers on viewing or presenting your print…

If you’ve come this far you are obviously concerned at the accuracy and quality of the print. How you display a print can be equally as important as all of the steps we just provided on the production side. Light temperature can add another wrench into the color management mix when viewing a print for accuracy.

The print will look different under a cooler light source (fluorescent) than a warmer light source (Tungsten). So, if you have calibrated for 5500 K on your monitor but are viewing it in a warmer light the colors on the print would look warmer than on your monitor.

Keeping lighting consistent will help you judge accuracy in fairness. In a perfect world your workspace would have daylight-balanced bulbs (5500 K) installed and you would block out any exterior light sources that would interfere with the temperature of the light around your work computer. Your monitor would be calibrated using the same daylight 5500 K setting.

It’s not often we find customers working under such tight constrictions but those that do are less likely to find discrepancies when comparing the soft proof to print.

This leads to the next question: “What if I don’t know what light my customer is displaying the final product under?” Well, that is subject that you can educate your customers about! Providing them with a document that underlines proper care of the print and proper lighting instructions will only back up the fact that you are their printing expert. That should be part of the reason they go to you and not the guy down the street.

Here’s an example of the lighting instructions you can provide your customer: Placing your print under daylight balanced bulbs with minimal varied light interference will give the audience the most accurate depiction of the original art/photo.

Warning! Look Before Leaping with Lion

Compatibility issues with Mac Lion OS 10.7The warnings are rolling in from various graphics software developers about incompatibilities with the new Mac operating system, Lion 10.7. As with any new OS release there are legions of detractors and supporters. Either way, it really doesn’t matter, because it’s the new OS and eventually the din of software punditry will die down as Mac users migrate to Lion 10.7.

However, if you’re making the leap you’ll need to check in with your software vendors to find out what the compatibility issues are at this point. For instance, ColorByte, developers of the ImagePrint RIP used primarily for photographic and fine art printing, released a statement that Versions 8 and older of the software are not compatible. A new version, 9 to be exact, is expected to be released next month and will be compatible with Lion. If you purchased Version 8 after April 15 the upgrade to the Lion-compatible version will be free.

Software compatibility issues with Mac Lion OS 10.7Large-format production RIPS – like ONYX and Wasatch – are immune since they only run on a PC. However, if you have a large-format production RIP on a Mac, expect issues and even complete incompatibility. Once again, check with your software vendor for specifics.

If you’re printing through the printer driver, make sure to touch base with the manufacturer of your printer. Canon for instance, has a list of updated driver releases for its line of large-format printers, which you can find here. For Epson, click here, and for HP, click here.

Adobe has issued a list of compatibility issues for its suite of products, including Acrobat, Illustrator, Lightroom and Photoshop. Click here for the full list of issues.

If you run into any problems, contact a LexJet customer specialist at 800-453-9538, and they’ll run down the issue and find an answer for you as quickly as possible.

How to Print through Adobe Illustrator and the Epson Driver

How to print throug Illustrator and the Epson printer driverA common file type in the print workflow is Adobe Illustrator. If you don’t have a RIP (Raster Image Processor) and you’re printing through the printer driver, you need to know how to make the correct color management and print settings in Illustrator. A sound workflow will help you to achieve consistent results.

In the two videos below, you will learn how to print through Illustrator and the Epson printer driver using a Mac or a PC, in that order. We’ll follow up with a post on how to print through Illustrator and the Canon printer driver for both Mac and PC, so keep an eye on the LexJet Blog for those instructions…

Borderless Printing through Photoshop and the Epson Driver

Printing borderless Photoshop Epson printer driverOne of the commonly used features of large format inkjet printers is the borderless printing function. This can be a huge time saver since trimming prints can be greatly reduced or even eliminated.

Before printing borderless, examine the common output sizes and buy rolls that fit those sizes. For example, if the majority of your business is selling 8×10 units, then buy 10-inch rolls. If the majority of your sales are 24x20s and 24x30s, buy 24-inch rolls.

Once you have the proper roll sizes, you simply need to set up your workflow to execute the prints properly. Keep in mind that most printers cannot print borderless on sheets (the Epson 3880, 3800, R2880 and R2400 are the only two really designed for this).Also, keep in mind that most printers can’t print borderless on all roll sizes. Check your owner’s manual to see which roll sizes your printer can print to successfully in borderless mode.

In the two videos below, you will learn how to print borderless images through Photoshop and the Epson printer driver using a Mac or a PC, in that order.

To learn about the full workflow for printing through Photoshop and the Epson printer driver, click here for Mac and click here for PC.

Printing Targets for Custom Profiles: Canon Print Plug-In for Photoshop

Custom profiles Canon Print Plug-In PhotoshopLexJet offers free profiles for a variety of printer and media that can help to optimize the quality of your inkjet printing output. Those profiles can be accessed here http://www.lexjet.com/Profiles.aspx. If you ever need to create a custom profile, the workflow is different than when printing targets through Photoshop and the printer driver.

In the video below, you will learn how to print targets for creating custom profiles using the imagePROGRAF Print Plug-In for Photoshop.

Borderless Printing through the Canon Plug-In for Photoshop

Borderless printing through the Canon Plug-In PhotoshopThe successful studio or print shop looks to maximize efficiency in all of its processes. This is particularly true with in-house printing, which is why the ability to print borderless and eliminate a lot of needless trimming is so important.

Before printing borderless, examine the common output sizes and buy rolls that fit those sizes. For example, if the majority of your business is selling 8×10 units, then buy 10-inch rolls. If the majority of your sales are 24x20s and 24x30s, buy 24-inch rolls.

Once you have the proper roll sizes, you simply need to set up your workflow to execute the prints properly. Keep in mind that most printers cannot print borderless on sheets (the Epson 3880, 3800, R2880 and R2400 are the only two really designed for this).

Also, keep in mind that most printers can’t print borderless on all roll sizes. Check your owner’s manual to see which roll sizes your printer can print to successfully in borderless mode.

In the video below you will learn how to print borderless images using the imagePROGRAF Print Plug-In for Photoshop.

  • To learn about the full workflow for printing through the imagePROGRAF Print Plug-In for Photoshop, click here.
  • To learn how to print borderless images through Photoshop and the Canon printer driver for the Mac, click here. For PC instructions, click here

Related videos:

Borderless printing through Photoshop and the Canon driver
Printing through the Canon Print Plug-In for Photoshop