Let’s Go Trade Show! A Virtual Tour with LexJet

On Friday, April 17, we’re bringing the latest news, tips, demos and product launches right to you with our LexJet Virtual Let’s Go Trade Show! We’ll have valuable insight for dealing with the impacts of COVID-19, as well as lots of insider tips and sneak peeks on the products and services you’ll need to prepare for when everyone returns to work.

During this event, from 11 a.m. to 3:45 p.m. ET, we’ll be covering the following topics:

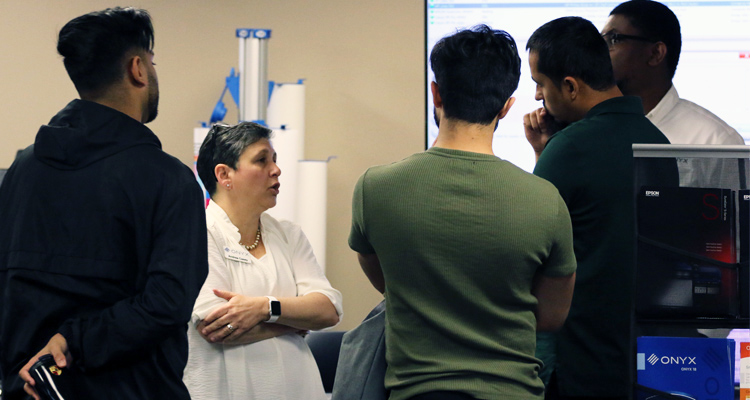
  • Live demo showing how HP Adhesive Vinyl can be used for almost any application
  • Best social media marketing practices now and post-COVID-19
  • Discover the hot new window textile, Squid
  • Dye-sub applications with the Epson F Series
  • A live demo of HP Latex Print & Cut

Sign up today and we’ll provide you with the links of each of the live sessions. Choose the ones you’d like to attend, and drop on by. We look forward to seeing you (virtually) April 17!

SIGN UP NOW

Join the LexJet Experience in Florida

We’re hosting our second LexJet Experience in our Sarasota, Fla., headquarters on Sept. 24-26. The event will feature tons of ways for print service providers to improve their operation’s workflow and their bottom line!

On Sept. 24-25, join Onyx for a two-day Onyx Color Management Certification Course. You’ll learn the basics of color theory and get hands-on practice creating profiles while mastering color management settings in your RIP. Registration is $350 per attendee, and includes breakfast and lunch.

On Sept 26, we’ll be hosting our LexJet Experience Open House, a free event with industry experts who will answer questions about equipment, software, print media and more. Enjoy special discounts, giveaways and lunch on us!

REGISTER TODAY for the Onyx course, the open house or both!

If you are travelling from out of town, we have arranged a discounted room rate at Art Ovation Hotel in downtown Sarasota for our attendees requiring overnight accommodations.  The rate for our attendees will be $109 per night (single or double) + a discounted resort fee of $15. Limited rooms are available, so please make your reservation as soon as possible. Book your group rate for S-One Holdings.

Finding the Best Lighting for Color Calibration and Print Evaluation

Back in the day when I, Tom Hauenstein, was on the road teaching the principles of color management I was often asked, “What color temperature bulbs should I use for evaluating prints?” Another common question was, “What color temperature should I use when calibrating my monitor?”

The answers to these questions are actually related to each other, and the right answer to each is… whatever color temperature you prefer.

Color Temperature Reference ChartHowever, these two color temperatures – for both the monitor and the lighting you use for evaluating prints – need to be consistent. Start by determining which monitor color temperature is right for you.  The usual options range from 5000 K to 6500 K.

I find 5000 K to be a little too warm and 6500 K too cool, Goldilocks. Therefore, I feel that a color temperature of 5500 K is just right.  Most new calibration software allows you to calibrate your monitor to different white points. This makes it easy for you to test which color temperature is right for you.

The Test
Find a file that is a good evaluation image. The PDI target usually works and can be found on LexJet’s website at the following link: http://www.lexjet.com/LexJetWebProfiles/Epson%20Printers/Epson%202200/Driver/PDI%20Target.tif.

White Balance
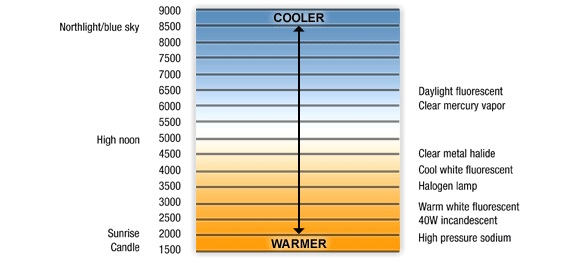
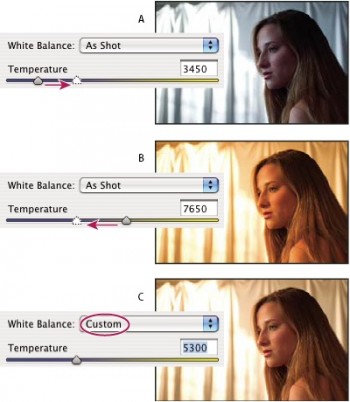
Calibrate and profile the monitor to 5000 K. Open the evaluation image and examine it at this temperature. Pay attention to the gray build in the file and the flesh tones. Then, calibrate and profile the monitor for 6500 K and do the same thing.

Most likely you will prefer the look of one over the other. If you have two computers, then it is really nice because you can place them side by side. You can then calibrate and profile one to 5000 K and the other to 6500 K and not have to rely on your memory.

Then do a third calibration and profile halfway between these two at 5700 K and compare them to the other two. This will give you an idea which color temperature works best for you. I know this test takes quite a bit of time, but it is something you will have to do only once in your life. Once you decide which temperature is the best for your eyes, your job is done.

Light Bulbs
Now that you know which color temperature you like best for the monitor, the light bulbs are easy. You simply need to find bulbs with the same color temperature as your monitor.

You should evaluate prints in the same temperature as you color corrected them on-screen. This will eliminate a lot of the discrepancies between the print and the monitor. You can usually Google a certain color temperature and find a bulb that matches it.

Doing this should tighten up color management, and allow you to trust your soft proof.

Tom Hauenstein is a technical sales specialist for LexJet’s line of primers and coatings for HP Indigo presses, and brings his expertise in the printing process and color management to commercial and large-format printing customers across the U.S. Tom is also a member of the Technical Advisory Board for Sign & Digital Graphics magazine.

Transforming Trash into Art to Help Reduce Trash

No Es Basura Exhibition

For three months in the spring of 2012, from March 7 to June 6, Peter Gwillim Kreitler collected trash from 1,250 linear feet of Santa Monica Beach, California. This trash collection turned into a photography collection called No Es Basura, This is not Trash, now on display at the Bergamot Station Arts Center in Santa Monica.

No Es Basura ExhibitionIn the introduction to the collection, Kreitler explains: “Sixteen months later, John Reiff Williams, the gentleman who photographed our wedding in 1985, embraced the challenge and brought what was discarded, forgotten, or simply mundane into an object of art. The transformation is evident. And now our venture is intended to delight, inspire and motivate all of us to embrace our commitment to cleaner oceans and beaches.”

No Es Basura ExhibitionWilliams was an excellent choice, as his photography often blurs the lines, literally and figuratively, between the abstract and reality, perhaps best illustrated by his three signature photographic series – the La Jolla Beach Project, The Edge of Collapse Series from Mexico City and the Hollywood Boulevard Series – covered here at the LexJet Blog.

“Peter was going to do the project himself, and kept calling more for advice because he couldn’t get the results he wanted. He asked me to photograph the Arrowhead plastic water bottle, which was the first one in the series, and after that he said, ‘You have to photograph this whole show.’ He’s an old friend, so I couldn’t say no,” recalls Williams. “He had boxes and boxes of stuff, and finally brought the boxes over. After three or four boxes of that you scratch your head to remember what was in the first box, so I put the items in clear plastic. Even if I knew it was going to be a show I wasn’t thinking about continuity, but just the integrity of each object. These objects sat out for two or three days sometimes as I thought about them.”

Peter Gwillim KreitlerAs an example, the photo shown here of Kreitler standing next to the print of tangled fishing lures, hooks and bobbers at the exhibition was a matter of perspective. Williams imagined he was underwater, he was a fish, and this was his next meal.

“I tried to be honest with the photography, and asked myself: ‘Have I seen anything like this before,’ and, ‘Can I take this image any further?’ If you can’t amaze yourself, then you can’t amaze anyone else,” says Williams.

Williams estimates he took 5,000 photos of the debris and detritus that Kreitler collected at Santa Monica Beach and printed about 125 for the exhibition. Williams printed all the test prints, but was limited in scale by the size of his Epson 3880 inkjet printer. So, he called on master printer Roger Wong to print the gallery pieces, ranging from 16″ x 20″ to 40″ x 60″, on Hahnemuhle FineArt Baryta 325 g.

John Reiff Williams
The photographer, John Reiff Williams.

“Our profiles, printers, monitors and color-management systems were all matched, so Roger was basically able to print blind with just a few adjustments,” explains Williams. “Up until this point I had been printing on Hahnemuhle photo rag, so this was a big switch for me to go to a gloss paper, and the prints look great.”

To see the photographic collection, click here.

Walls to Windows: Creative Interior Imagery Makes a Perfect Match


Creative Interior Imagery
Creative Interior Imagery not only seamlessly carried the “tree” theme from walls to windows (from left to right), but perfectly matched the interior paint.

Creative Interior Imagery, based in West Pittson, Pa., merged interior décor and design with digital printing for a medical center that wanted something less conventional and more inviting for its patients.

Eric Marsico, a partner at Creative Interior Imagery with Keith Tomkins, recommended hundreds of feet of wall and window murals to carry the common “tree” theme recommended by the medical center’s architect throughout much of the facility.

“They were hesitant at first because they had used wall murals on other projects that didn’t hold up. We pitched LexJet Velvet WallPro SUV with ClearShield Wall Armor and found that the stuff is tough when partnered together. We beat it up in the shop to test it beforehand and it held up really well,” says Tomkins.

Atrium Decor PrintingFor the windowed nurses’ station Tomkins chose LexJet Simple Perforated Window Vinyl (70/30). The trick was to ensure a perfect match from walls to windows. Not only that, but Tomkins took great pains to match the interior paint as well.

“They painted their building with a specific paint color, so we went to the paint manufacturer’s website, pulled those paint numbers, and plugged them in to make sure we matched their paint. We got the RGB formulations, converted them to CMYK and incorporated those colors into the graphic. They were impressed with how closely our prints matched their paint colors. You can’t tell where the wallpaper ends and the paint starts,” says Tomkins.

Tomkins adds that to ensure a seamless transition along the walls through the windows and back onto the walls from panel to panel he took pictures of the empty spaces and manually lined everything up instead of using the tiling function in the RIP software.

Creative Interior Imagery
The combination of GigaPan photography printed on LexJet Velvet WallPro SUV with an Epson SureColor S30670 brings the tree theme to life in the main atrium.

In addition to the vector tree art that adorns the walls and windows, Creative Interior Imagery installed a gigantic photo of a tree Tomkins found and captured in a local park. Tomkins photographed the tree with his GigaPan camera so that fine details would be apparent in the final print, also on LexJet Velvet WallPro and protected with Wall Armor.

“They wanted the tree to go up the wall and across the ceiling so you felt like you were sitting underneath it. I took the shot going up the trunk and through the canopy. By the time it was done it was a 1.2-gigapixel image. It’s 11 feet off the ground, goes up 19 feet and across the ceiling 14 or 15 feet and is about 10-12 feet wide. The resolution is amazing. If you get right up to it you can see the texture in the bark; it’s just like you’re standing in front of the tree,” says Tomkins.

Tomkins adds that this is the company’s largest project to date and that the combination of the right materials and a precise color management system made it a successful project sure to bring similar projects through the doors in the future.

Creative Interior Imagery“We spend a lot of time working with profiling software. We have an i1 and custom-profile all of our media. There are manufacturing tolerances in everything – printer, ink and media – and when we do it in-house we can get it spot on, like we did with the paint colors, which shows how the profiling helps. That’s one of the things that sets us apart, and when you get into a major project like using different materials and matching décor and paint color management is a big issue,” explains Tomkins. “And, at nighttime when the inside is lit, you can see it from the highway and it looks fantastic.”

The project was printed on Creative Interior Imagery’s Epson SureColor S30670 low-solvent printer. To illustrate the tight color tolerances Creative Interior Imagery’s color management system can produce, Tomkins recently created a gigapan wall mural of New York City using 12 different inkjet media on four different printers (the S30670, and the Epson Stylus Pro 11880, 7900 and 4880).

“With this 2 1/2′ x 6′ mural in our showroom we can show people how their print will look on the different media and show off our color matching skills, because that’s difficult to do,” says Tomkins. “The architectural firm did a walk-through of the medical center with interior designers after we installed the murals, and person who was leading the group remarked that no one else could match the quality of the materials and workmanship, so we were feeling pretty smug about that.”

Free Webinar this Friday with Chris Orwig Explores Lightroom

Lightroom Webinar with Chris OrwigCalifornia-based photographer, author and educator Chris Orwig, who has a reputation for bringing practical experience, technical expertise and passion to the teaching he provides, will lead a free webinar hosted by X-Rite this Friday, April 11, starting at 1 p.m. ET.

Using his own images from start to finish, Chris will highlight how photographers can use an X-Rite ColorChecker Passport with Adobe Lightroom, to make better photographs. Attendees of this live webinar will also have the opportunity to ask Chris questions.

Here are some of the topics Chris will discuss:

  • Lightroom new features
  • Working with Catalogs and backing up your work
  • Creating custom profiles with the ColorChecker Passport
  • Organizing with the Library Module
  • Enhancing your photographs with Develop Module
  • Crafting expressive photographs
  • Lightroom workflow from start to finish

To register for the free 1 p.m. ET webinar on April 11, visit:

https://www2.gotomeeting.com/register/357466666